How to Connect Two or More Monitors to MacBook Neo Using DisplayLink?
How to Connect Two or More Monitors to MacBook Neo Using DisplayLink
You just bought a MacBook Neo. You plug your second monitor in. Nothing. You try both USB-C ports. Still only one screen works. You search online and find out that MacBook Neo only supports one external monitor out of the box — no matter how many cables you try.
This is one of the most searched frustrations among new MacBook Neo owners, and the fix is well established: a DisplayLink® docking station or adapter. It is a specific type of dock that bypasses Apple’s built-in display limit using a dedicated chip and a small software driver.
This guide explains exactly why the limit exists, how DisplayLink solves it, and which mbeat certified product is right for your setup — in plain English, no jargon.
Why MacBook Neo Only Supports One External Monitor
This is not a cable problem. It is not a settings problem. It is a hardware decision Apple made in the chip. The MacBook Neo runs on Apple’s A18 Pro chip, which has a built-in display engine that is limited to one external video output. Apple reserves multi-monitor native support for the more expensive MacBook Pro range.

The rear USB-C port
Supports USB 3.2 Gen 2 at 10Gbps with DisplayPort 1.4. This is the only port that outputs video. Connect your monitor or dock here.
The front USB-C port
Limited to USB 2.0 at 480Mbps. It handles charging and basic data transfer only. It cannot output video and will not improve your monitor count.
Also worth knowing: MacBook Neo has no Thunderbolt port. This means the high-bandwidth docking solutions built for MacBook Pro do not apply here. The right solution for the Neo is DisplayLink — which was designed exactly for this type of hardware limitation.
MacBook Neo vs MacBook Pro: the display difference
MacBook Neo: 1 external monitor natively. MacBook Pro M4/M5: 2–4 external monitors natively via Thunderbolt. If you have a Neo and need two or more screens, DisplayLink is your solution. A regular USB-C dock will not help — it still relies on the same limited native display engine.
What Is DisplayLink and Why Does It Work When a Regular Dock Does Not?
A regular USB-C dock passes video through your Mac’s built-in graphics — which is why it hits the same one-monitor wall. A DisplayLink docking station works completely differently. It has its own dedicated chip inside that handles video processing independently, bypassing your Mac’s display engine entirely.

Here is how it works in plain English:
Step 1 — Software compresses the screen image
The free DisplayLink Manager app (macOS driver) runs in the background on your Mac. It captures what should appear on your extra screen and compresses it into a USB data stream.
Step 2 — The data travels over USB-C to the dock
That compressed video stream is sent down a standard USB-C cable to your mbeat DisplayLink dock — along with data, Ethernet, and power on the same cable.
Step 3 — The DisplayLink chip inside the dock reconstructs the image
A dedicated DisplayLink chip decompresses the stream and outputs a clean, full-quality video signal to each connected HDMI or DisplayPort monitor — up to 4K@60Hz per screen.
Step 4 — macOS treats each screen as a separate extended display
Your Mac sees the dock as a virtual graphics adapter. Apple’s one-monitor hardware limit does not affect it. Each DisplayLink screen appears as its own independent extended desktop — not a mirror, not a clone.
Important: You need a DisplayLink dock specifically — not just any USB-C dock
Many USB-C docks and hubs have multiple HDMI ports but do not have a DisplayLink chip. On a MacBook Neo, plugging two monitors into a non-DisplayLink dock will still only activate one screen — or both will mirror. You need a dock that specifically states DisplayLink certification or compatibility, like mbeat’s certified range.
Extended Desktop vs Mirroring — What’s the Difference?
This causes a lot of confusion. When you connect a second monitor to a Mac, you can get two very different results:

Extended desktop — what you want
Each monitor shows different content. You can drag windows between screens, run different apps side by side, and arrange them in any layout. This is the setup that actually improves productivity. DisplayLink delivers true extended desktop on MacBook Neo.
Mirror mode — what you do not want
Both monitors show the exact same image. This is useless for productivity. It happens when you use a non-DisplayLink dock on a Mac, or when you connect an MST hub (MST is not supported by macOS at all). If your second monitor is just repeating what is on your first, this is your problem.
How to Set Up a Dual Monitor on MacBook Neo: Step-by-Step
Once you have a DisplayLink dock, first-time setup takes under five minutes. Here is the exact process:
Step 1 — Download and install DisplayLink Manager
Go to synaptics.com/products/displaylink-graphics/downloads/macos and download the free DisplayLink Manager app. Install it like any other Mac application. This is the software driver that makes the whole thing work.
Mac Users: Driver Required Before Connecting
Install DisplayLink Manager before plugging in your dock for the cleanest setup experience. On Windows, the driver installs automatically via Windows Update. On macOS, manual installation is required — it is a one-time step. mbeat includes a driver download card with every DisplayLink product.
Step 2 — Allow Screen Recording in macOS Privacy settings
macOS will ask you to grant Screen Recording permission to DisplayLink Manager under System Settings → Privacy & Security → Screen Recording. This is not optional — it is how the driver captures your screen content to compress and transmit over USB. No data is stored or recorded at any time.
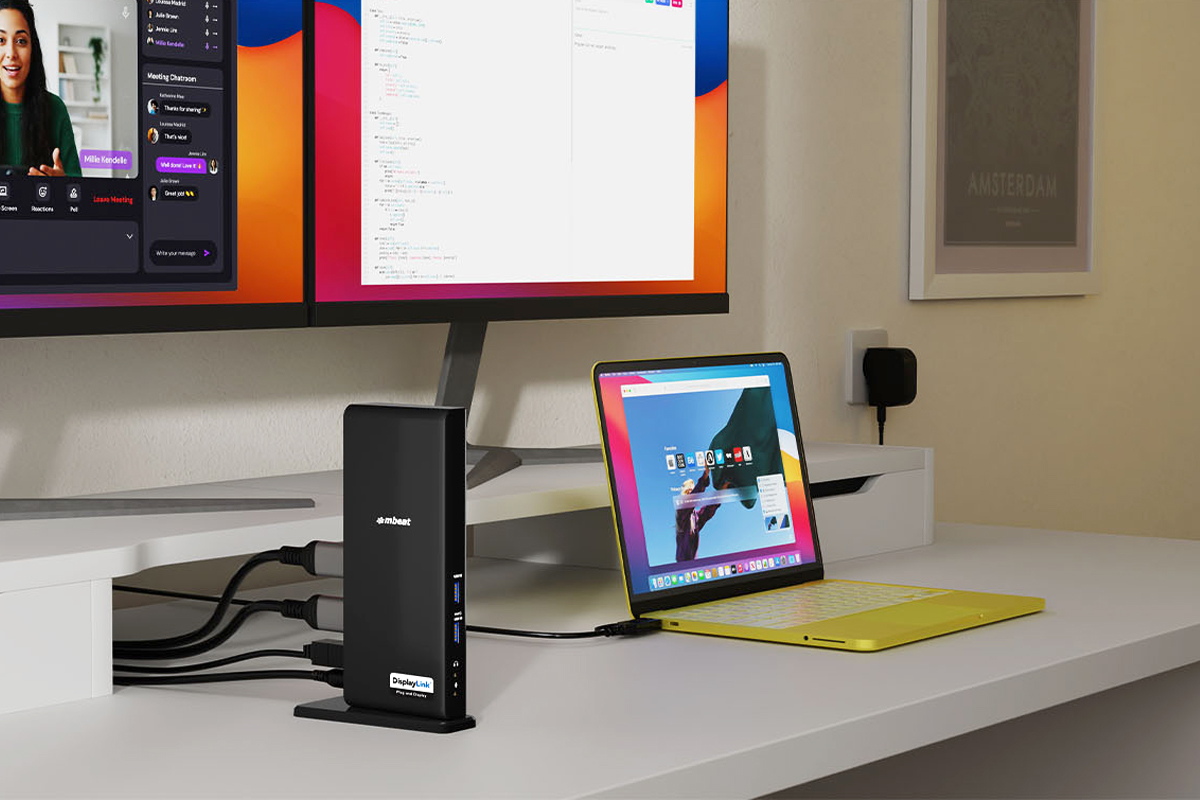
Step 3 — Plug your dock into the rear USB-C port only
Connect the mbeat dock to the rear USB-C port on your MacBook Neo — this is the port towards the back of the left side. The front port is USB 2.0 and will not work for DisplayLink. Connect your monitors to the dock via HDMI. macOS detects them automatically within a few seconds.
Step 4 — Arrange your displays in macOS System Settings
Open System Settings → Displays. You will see all connected screens listed. Drag them into the physical layout that matches your desk. Make sure “Extend display” is selected rather than “Mirror”. That is it — you now have a multi-monitor Mac setup from your MacBook Neo.
What DisplayLink Does Not Do — Be Aware Before You Buy
DisplayLink is the right answer for most Mac multi-monitor setups. But there are a few real limitations worth knowing up front:
Netflix and DRM-protected streaming will not work on DisplayLink screens
DisplayLink does not support HDCP copy protection. This means Netflix, Disney+, Apple TV+, Stan, and similar services will not play on your DisplayLink monitor outputs. They work fine on your MacBook Neo’s built-in screen. This is the most common gotcha people discover after buying a DisplayLink dock — now you know in advance.
mbeat’s DisplayLink range is configured for 4K@60Hz per display
All mbeat certified DisplayLink products output at up to 4K@60Hz per connected screen. This covers every display in our dual, triple, and quad monitor configurations. If your workflow demands a 120Hz or higher refresh rate — for gaming or high frame rate video work — a MacBook Pro with a Thunderbolt dock is the right hardware pairing for that specific use case.
For everyday professional work, 4K@60Hz is more than enough
Documents, spreadsheets, email, Slack, Zoom, web browsing, design tools like Figma and Canva, code editors — all run perfectly at 4K@60Hz. It is the multi-monitor standard used by major enterprises worldwide. The 60Hz configuration is a deliberate choice that maximises screen count and broad device compatibility across the range.
The Best DisplayLink Docks for MacBook Neo in Australia
mbeat’s certified DisplayLink range is fully compatible with MacBook Neo and stocked locally in Australia. All products carry official Synaptics certification and a 2-year warranty. Here is how to pick the right one:

mbeat Certified DisplayLink Range — MacBook Neo Compatible
Dual, Triple, or Quad Monitors. One USB-C Cable.
Independently certified by Synaptics. Backed by a 2-year warranty with Melbourne-based local support. Available through Harvey Norman, JB Hi-Fi, and Office National.
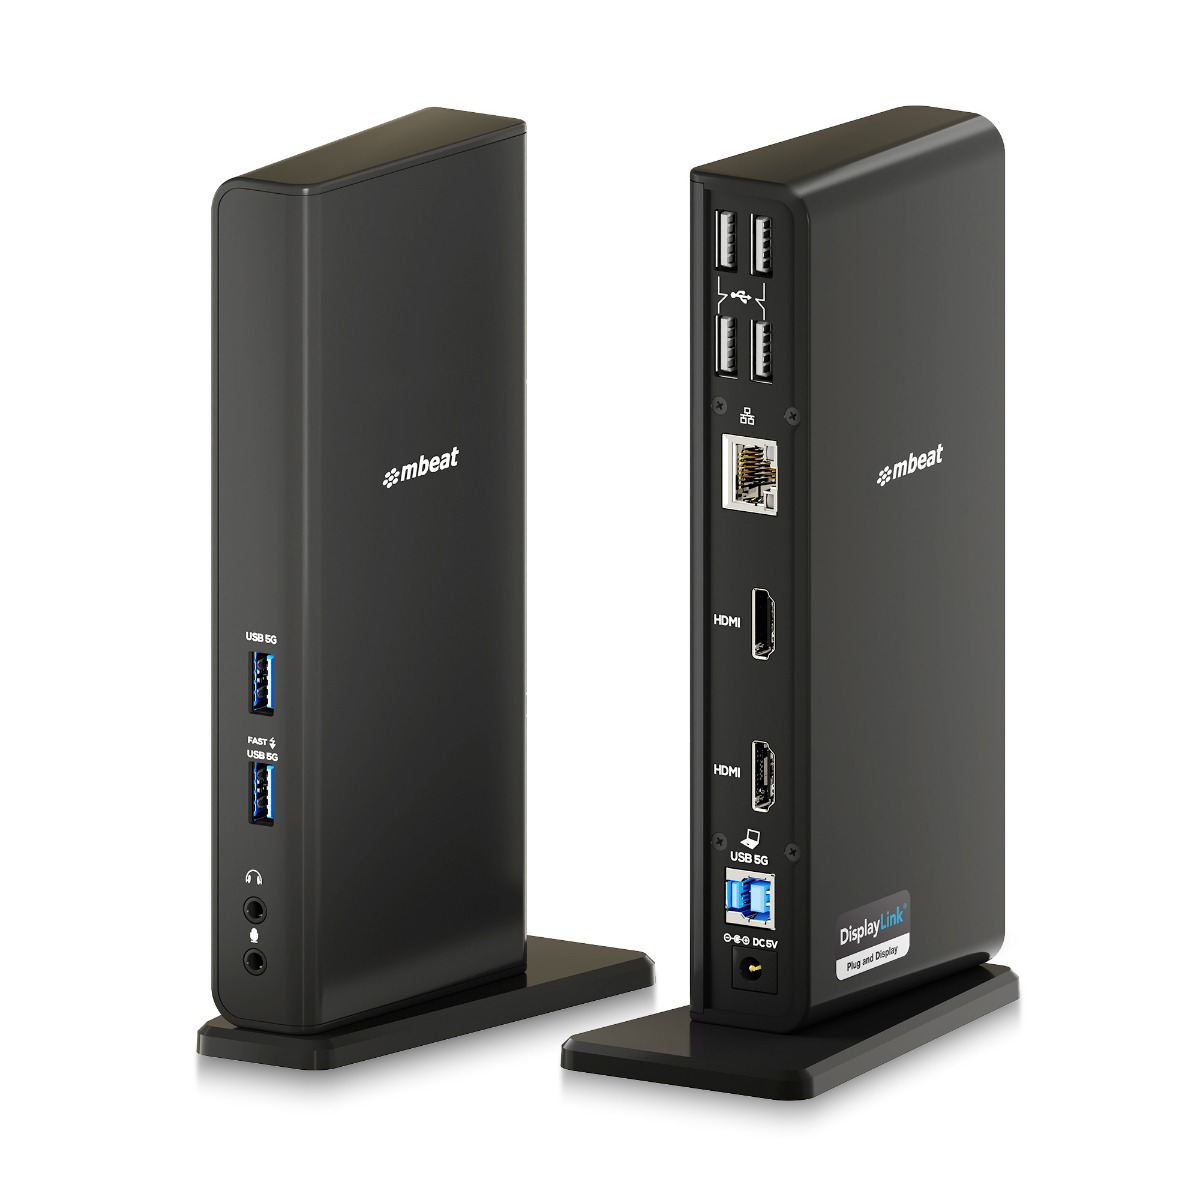
MB-DOCK-DLD20 — Best for: dual monitor desk setup with Ethernet
USB-C/A Dual HDMI DisplayLink® Docking Station
Dual 1080p@60Hz · Mac & Windows · Gigabit LAN · USB-A & USB-C ports · Plug and Display Certified
View Product →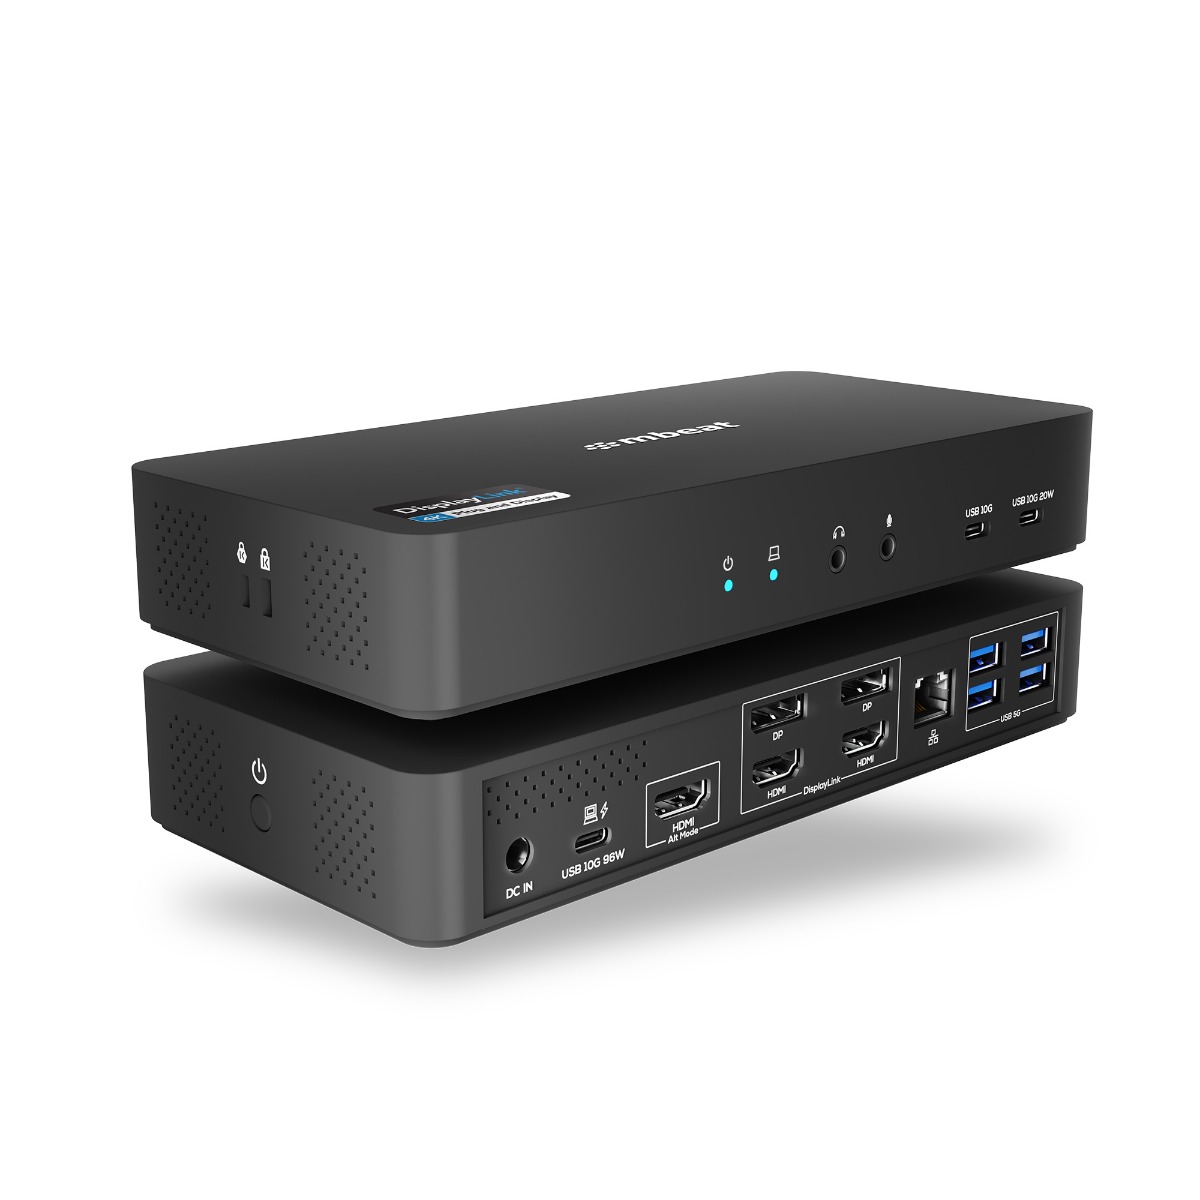
MB-DOCK-HDL18 — Best for: triple 4K monitors with full docking station
USB-C Triple 4K Display Docking Station
Triple 4K@60Hz (DP Alt Mode & DisplayLink) · 96W PD · 135W PSU · K-Lock · 4K Certified
View Product →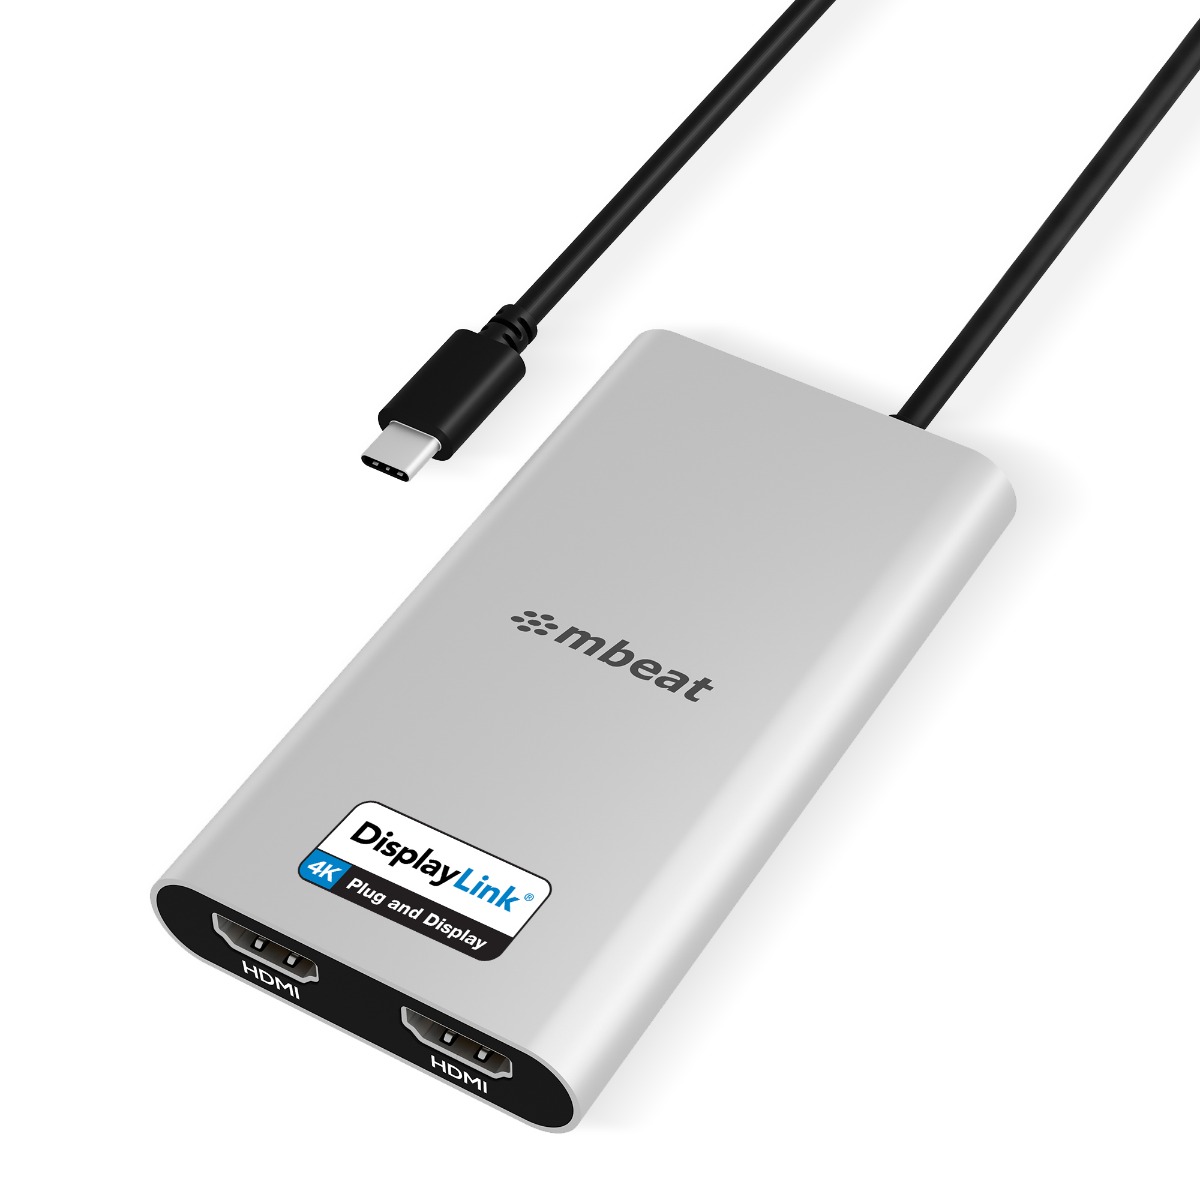
MB-DLA-CD2H — Best for: dual 4K monitors, compact adapter form
USB-C Dual 4K HDMI DisplayLink® Adapter with PD Pass-through
Dual 4K@60Hz · 90W PD Pass-through · Mac M1/M2/M3/Neo & Windows · 4K Certified
View Product →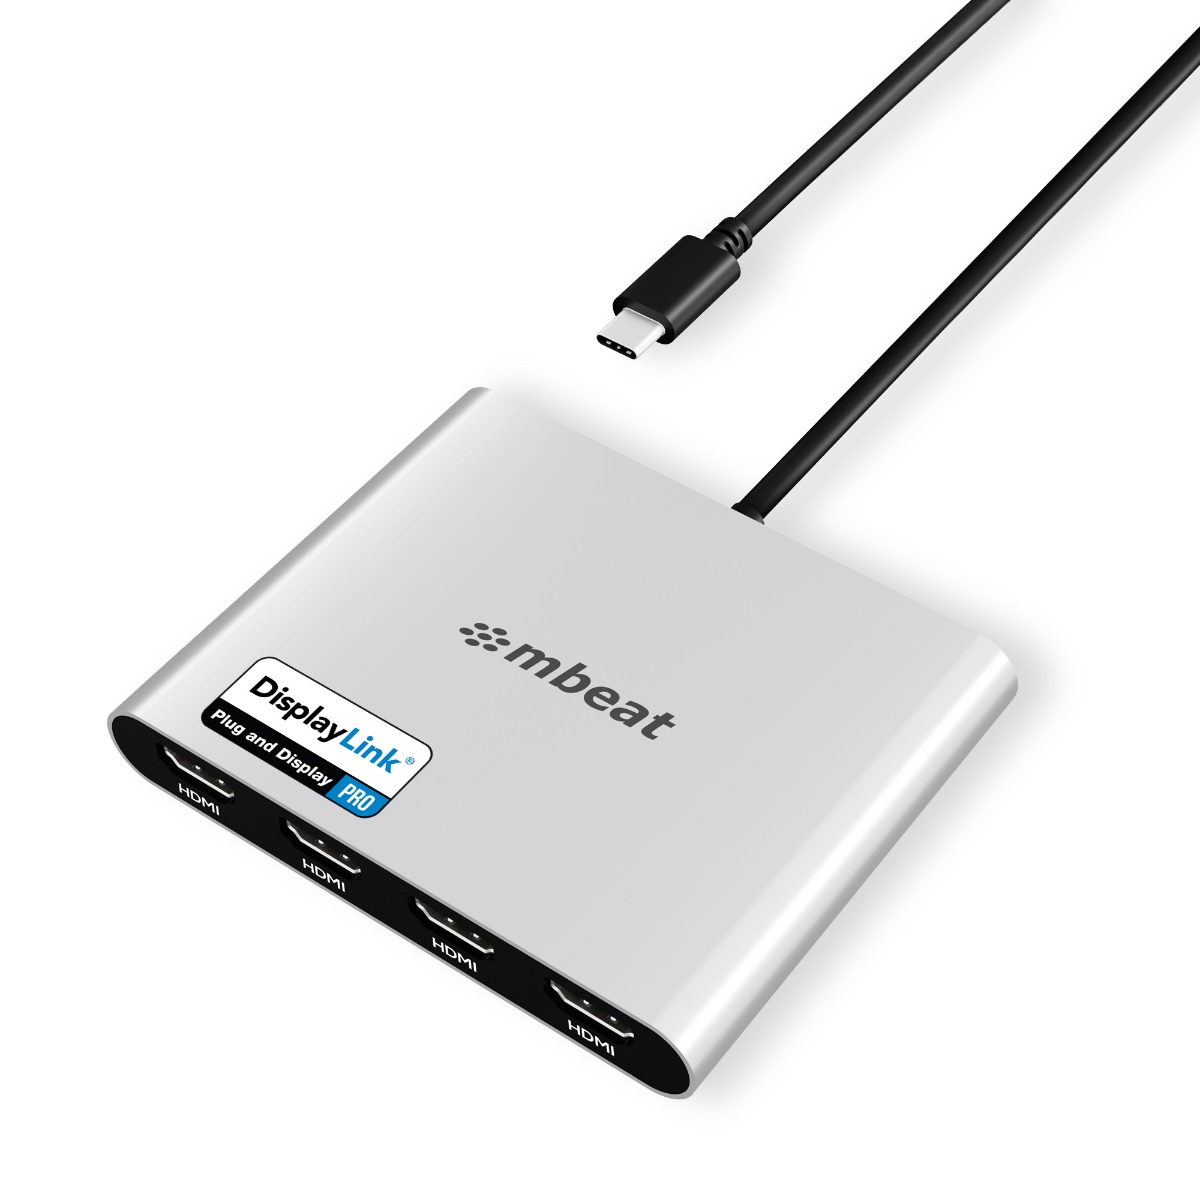
MB-DLA-CQ4H — Best for: quad 4K monitors, enterprise or power user
USB-C Quad 4K HDMI DisplayLink® Adapter with PD Pass-through
Quad 4K@60Hz · 90W PD Pass-through · Mac M1/M2/M3/Neo & Windows · PRO Certified
View Product →Australian owned and operated · Melbourne-based support · 2-year warranty
Which DisplayLink Dock Should You Buy for MacBook Neo?
I want a dual monitor desk setup with Ethernet and USB ports
MB-DOCK-DLD20. Two 1080p monitors, Gigabit Ethernet, USB-A and USB-C hub. Works with USB-A machines too. The most affordable entry into a proper docked workstation.
I want two sharp 4K monitors from a small adapter, not a big dock
MB-DLA-CD2H. Dual 4K@60Hz HDMI plus 90W laptop charging passthrough. Compact enough to travel with. The most popular DisplayLink adapter for MacBook Neo and M1/M2/M3 Mac owners.
I want three 4K monitors and a full USB-C docking station with high-wattage charging
MB-DOCK-HDL18. Triple 4K displays combining DisplayPort Alt Mode and DisplayLink, 96W Power Delivery, 135W power supply included, Kensington Lock slot. The right choice for a permanent high-performance desk.
I need four 4K monitors, or I am deploying to a mixed Mac and Windows office fleet
MB-DLA-CQ4H. Quad 4K@60Hz from one USB-C cable. Works on MacBook Neo, all Mac M1/M2/M3/M4/M5 models, and Windows. One SKU, every device — the enterprise standard choice.
Frequently Asked Questions
Can MacBook Neo connect to two monitors?
Not natively — MacBook Neo supports only one external monitor out of the box. To connect a second monitor (or more), you need a DisplayLink docking station or adapter. DisplayLink uses its own chip to bypass Apple’s hardware display limit. With a DisplayLink dock, MacBook Neo can drive two, three, or four external monitors in extended desktop mode.
Why does my second monitor only mirror on MacBook Neo?
If your second screen is duplicating your first screen instead of extending it, you are almost certainly using a standard USB-C dock without a DisplayLink chip, or a dock that uses MST technology (which macOS does not support for extended desktops). The fix is to use a certified DisplayLink dock like any mbeat model in the range above — then each screen will show different content as a true extended desktop.
Does MacBook Neo have Thunderbolt?
No. MacBook Neo does not have a Thunderbolt port. Its rear USB-C port supports USB 3.2 Gen 2 and DisplayPort Alt Mode, but not Thunderbolt. This means Thunderbolt docking stations designed for MacBook Pro will not work with the Neo. DisplayLink docks are the correct solution for MacBook Neo multi-monitor setups.
Do I need to install a driver for DisplayLink on Mac?
Yes. On macOS, you need to download and install the free DisplayLink Manager app from the Synaptics website before connecting your dock. Setup takes about two minutes. You also need to grant Screen Recording permission in macOS System Settings → Privacy & Security. On Windows, the driver installs automatically. mbeat includes a driver download guide with every DisplayLink product.
Can I watch Netflix on a DisplayLink monitor?
No — this is the most important limitation to know before buying. DisplayLink does not support HDCP copy protection, so Netflix, Disney+, Apple TV+, and other DRM-protected services will not play on DisplayLink monitor outputs. They work normally on your MacBook Neo’s built-in screen and on its native DisplayPort output. Everything else — apps, documents, web browsing, video calls — works perfectly.
What refresh rate do mbeat DisplayLink products support?
All mbeat certified DisplayLink products are configured for up to 4K@60Hz per connected display — across dual, triple, and quad monitor setups. For professional office and productivity use, 60Hz at 4K is smooth and more than adequate. If you specifically need 120Hz or higher refresh rates, a MacBook Pro paired with a Thunderbolt dock is the right solution for that use case.
Are mbeat DisplayLink products officially certified?
Yes. All four mbeat DisplayLink products are independently tested and certified under the official Synaptics DisplayLink Certified Logo Program — covering Plug and Display, 4K, and PRO certification tiers. mbeat is one of the few Australian-operated brands with certified DisplayLink products across multiple tiers, backed by a 2-year warranty and Melbourne-based support.
Continue Reading
Read Now
What is DisplayLink? Everything Mac and Windows Users Need to Know
New to DisplayLink? Start with our plain-English guide to the technology and why it solves the Mac multi-monitor problem.
Read Now
USB-C, DisplayPort Alt Mode, MST or DisplayLink — Which One Do You Actually Need?
Why does a regular dock only mirror on Mac? Why doesn’t MST work? We explain every connection standard clearly.
Read Now
DisplayLink Plug and Display vs 4K vs PRO — What the Badges Really Mean
Not all DisplayLink products are the same. Here is how to choose the right certification tier for your screen count and use case.
